Do It Yourself Cat Litter Box Furniture: Stylish, Easy, and Affordable Ideas
Having a cat means you need a place for its litter box. But litter boxes can look messy. They can spoil your room’s look. A good way to fix this is making your own cat litter box furniture. This is a smart idea. You can hide the litter box. You can make it look nice too.
Why Make Your Own Cat Litter Box Furniture?
Buying furniture for a litter box can be expensive. Also, you may not find the right size or style. When you make your own, you decide everything. Size, color, and style. You can match it with your home. You can also add special features.
Making your own furniture can be fun. It gives you control. You know where every part goes. You can make it strong and easy to clean. Most store-bought ones do not have these options.
Things to Think About Before You Start
- Size: Measure your cat’s litter box first.
- Space: Check the place where you want to put the furniture.
- Materials: Choose materials that are safe and easy to clean.
- Ventilation: Good air flow keeps smells down.
- Entry: Make a door or opening easy for your cat.
Materials You May Need
Here is a list of common materials for DIY litter box furniture:
| Material | Purpose |
|---|---|
| Wood (Plywood or MDF) | Main body of the furniture |
| Paint or Wood Finish | Protect and decorate the surface |
| Screws and Nails | Hold the parts together |
| Hinges | For doors or lids |
| Sandpaper | Smooth the wood edges |
| Vent Grille | Allow fresh air inside |
| Latch or Magnetic Catch | Keep doors closed |
Step-by-Step Guide to Build Cat Litter Box Furniture
Step 1: Measure Your Litter Box
Measure the length, width, and height of the litter box. Add a few inches to each side. This gives your cat room to move inside. Also, add space for cleaning.
Step 2: Choose Your Design
Decide what style you want. It can be a simple box with a door. Or a small cabinet with shelves on top. Pick a design that fits your room and needs.
Step 3: Cut The Wood
Cut the wood panels based on your measurements. You will need pieces for the top, bottom, sides, back, and front. Take your time to make clean cuts.
Step 4: Sand The Edges
Use sandpaper to smooth all edges. This stops splinters. It also makes painting easier and safer for your cat.
Step 5: Assemble The Box
Use screws or nails to put the pieces together. Start with the bottom and sides. Then add the back and front. Make sure the box is strong and steady.
Step 6: Add Ventilation
Cut small holes or add a vent grille on the sides or back. This helps keep the air fresh. It also reduces bad smells.
Step 7: Make The Door
Cut a door on the front panel. Attach it with hinges. Add a latch or magnetic catch to keep it closed. Make sure the door is big enough for your cat.
Step 8: Paint Or Finish
Paint the furniture with non-toxic paint. Or use a wood finish safe for pets. Let it dry fully before use. This protects the wood and looks nice.
Step 9: Place The Litter Box Inside
Put the litter box inside your new furniture. Check if your cat can enter and exit easily. Make any changes if needed.
Extra Tips for Your DIY Cat Litter Box Furniture
- Easy to Clean: Design the furniture so you can open it easily.
- Use Waterproof Paint: Protect furniture from spills and moisture.
- Add Storage: Use the top or side for storing litter bags or scoops.
- Soft Entrance: You can add a small rug or mat at the door.
- Test the Size: Let your cat try the furniture before finishing it.
Benefits of DIY Cat Litter Box Furniture
Here are some good reasons to build your own litter box furniture:
| Benefit | Why It Helps |
|---|---|
| Custom Size | Fits your cat’s litter box perfectly |
| Better Looks | Matches your home style |
| Cost Savings | Cheaper than store options |
| Easy to Clean | Open design for quick cleaning |
| Added Storage | Extra space for litter tools |
| Fun Project | Enjoy making something useful |

Credit: soeasybeinggreen-blog.com
Common Mistakes to Avoid
- Not measuring the litter box correctly.
- Choosing materials that are hard to clean.
- Not adding ventilation holes.
- Making the door too small for the cat.
- Using toxic paint or finishes.
- Building furniture too heavy to move.
Simple Design Ideas for Beginners
If you are new to woodworking, try these easy ideas:
- Basic Box: A simple wooden box with a cut-out door.
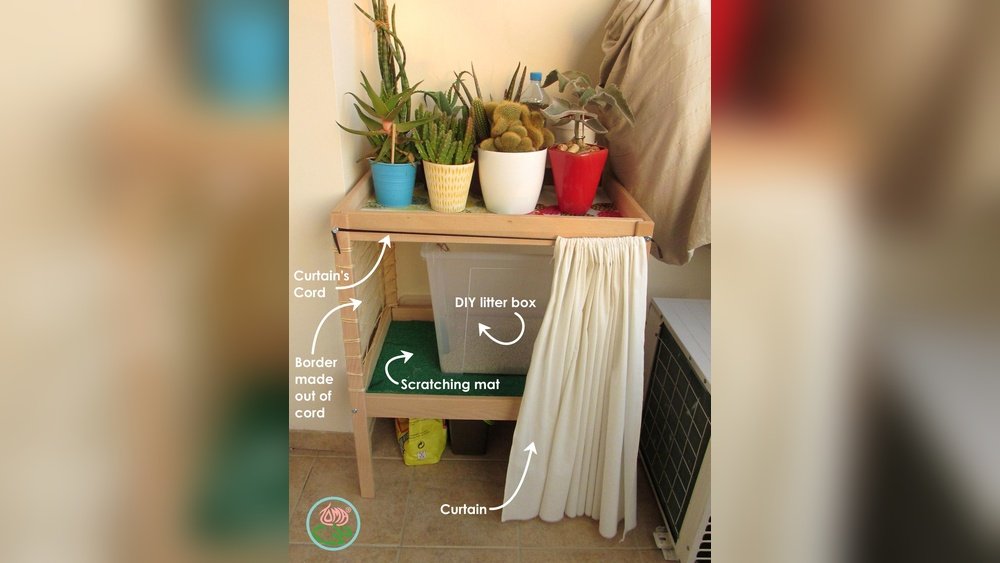
- Table Style: Build a low table with space under for the litter box.
- Storage Bench: A bench with a lid that opens to the litter box inside.
- Bookshelf Combo: Use a small bookshelf with one shelf removed for the litter box.
How to Keep the Furniture Fresh
Even with a good box, smells can happen. Here are tips to keep it fresh:
- Clean the litter box often.
- Use baking soda inside the box to reduce smell.
- Open the furniture door daily to air it out.
- Use air fresheners safe for pets nearby.
- Replace the litter regularly.

Credit: www.etsy.com
Frequently Asked Questions
What Materials Do I Need For Diy Cat Litter Box Furniture?
Basic wood, screws, paint, hinges, and a litter box fit are essential materials.
How Can I Hide The Litter Box In Furniture?
Build a small cabinet or bench with a door or flap for privacy.
What Size Should The Diy Cat Litter Box Furniture Be?
Make it slightly bigger than your cat’s litter box for easy access.
Can I Add Storage Space To The Litter Box Furniture?
Yes, add shelves or drawers to store cat supplies and keep things tidy.
Conclusion
Making your own cat litter box furniture is smart and fun. You get a nice place for the litter box. It fits your home style. It hides the box and smells better. You can save money and make extra storage. Follow the steps carefully. Use safe materials. Think about your cat’s comfort. Your cat and home will both be happy.
Try building your own cat litter box furniture today. It is easier than you think. Your cat will love it, and so will you.